Your cart is currently empty!
How To Raise a Burr On A Knife
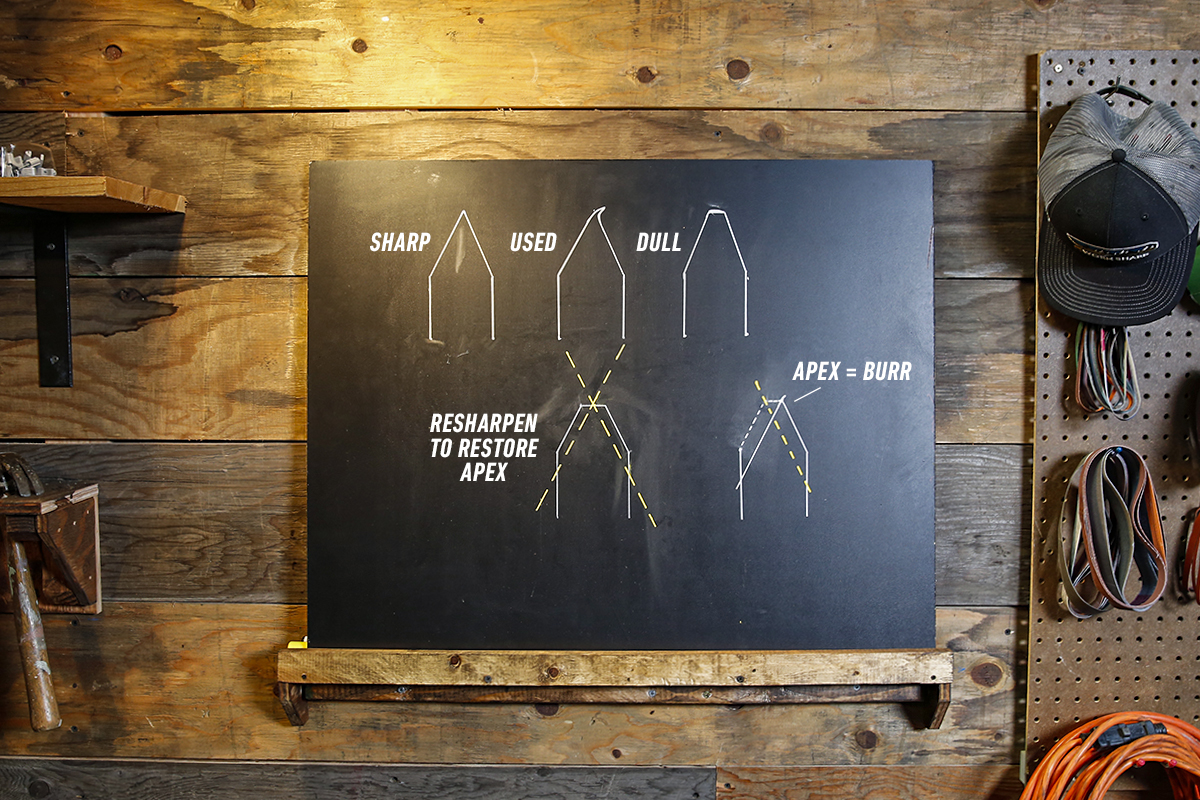
The importance of raising a burr when sharpening a knife cannot be understated. To get a knife sharp, you have to raise a burr. That is worth saying twice. To get a knife sharp, you must raise a burr.
What is a burr? To understand that, let’s talk about the process of sharpening and what makes the cutting edge.
When you are sharpening a knife, your objective is to move and/or remove material from the edge bevel of the knife; what you likely refer to as the knife’s edge. The edge bevel or secondary bevel is what forms the cutting surface of a knife.
To create this final apex, the blade of the knife must be beveled from the thickness of the spine to a relatively thin final thickness, before the edge bevel is cut in. Below is a cross-sectional diagram of the primary and the edge (or secondary) bevel:

You can see that there are shoulders at the point the secondary bevel transitions to the primary bevel. When you sharpen, you must select an angle that is precisely the same, or broader, than the secondary bevel. If you do not, your sharpening device with hit the shoulders of the secondary bevel and will never touch the final edge of the knife. If/when this happens, you will not be able to produce a burr.
If you have selected an appropriate edge angle (typically, it is a safe bet on outdoor knives to use 22 – 25 degrees and 17 degrees for most kitchen knives) then your sharpening efforts will be able to yield a burr.
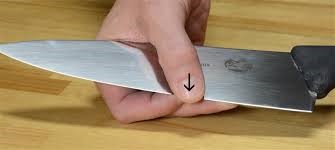
The burr is formed as you push the knife across the surface of your sharpening device or pull the sharpening device across your knife. As you do this, steel is moved out to the end of the edge bevel. You will be able to feel if a burr is formed by placing your finger on the side of the knife opposite the side you are sharpening and gently feeling from the spine off the edge of the knife.
“The Guru”, Steve Baker, Work Sharp Engineer says, “A good rule of thumb when working to form a burr is to count five strokes per side. Feel for a burr and then switch to the other side. Do this until you feel a consistent burr across the entire length of the edge. Once you do feel a burr, switch to the opposing side one last time and count five final strokes. It is important that you form a symmetrical edge and always counting five strokes per side keeps you from removing more on one side than the other.”
At this point, your knife is close to sharp. From here, you can work down your grit progression(s) or strop the knife to remove the burr. Once the burr is removed, the result will be a legitimately sharp edge and a more functional knife.
7 responses to “How To Raise a Burr On A Knife”
This is great material. Very good information here. One thought I have is that perhaps a knife angle should be set to your favorite sharpener. For example, the Worksharp Guided Field sharpener has 20 degree guides on it. I don’t know what angle is on my knives, and manufacturers don’t say sometimes. Seems like you get what you get, plus or minus, 23 degrees? for a pocket knife. It’s hard to even determine 20 degrees, because most guides accommodate the primary bevel, and not the shoulder. The “angle” of the knife blade is based on the shoulder, correct?
I guess there is nothing to suggest you couldn’t have an additional bevel, from the secondary bevel. For example, your blade is set to a 23 degree angle, but the Guided Field Sharpener is 20, so you just make a 20 degree angle on top of the 23 degree angle.
As an edge is used the very tip rolls to one side or the other. After further use, that edge breaks off leaving a dull spot. A honing steel can be used to straighten the edge again and prolong the life of the blade between sharpening.
I own a worksharp belt sharpener. Do you have a video on raising a burr with that product? Also did not explain what his angle guide was. Camera needs to be closer during demonstration so can tell what he’s doing. Don’t need to see representative and workshop. Thanks
Thanks for the feedback Matt, we’ll do our best to get more close up shots. As for the angle guide, I’m using the 20-degree guide ramp that comes with this sharpener. The sharpener is our new Benchstone sharpener. We’ve got a video using the Original Knife and Tool sharpener and raising a burr – you can find that on our youtube channel.